 ESPectre
Place your ESPectre sensor
Placement matters more than any threshold. ESPectre measures the radio link between your access point and the sensor, so people's usual route should cross that link. Find a good spot, check it with a ten-minute walk test, and only then tune.
Sections
A good starting placement
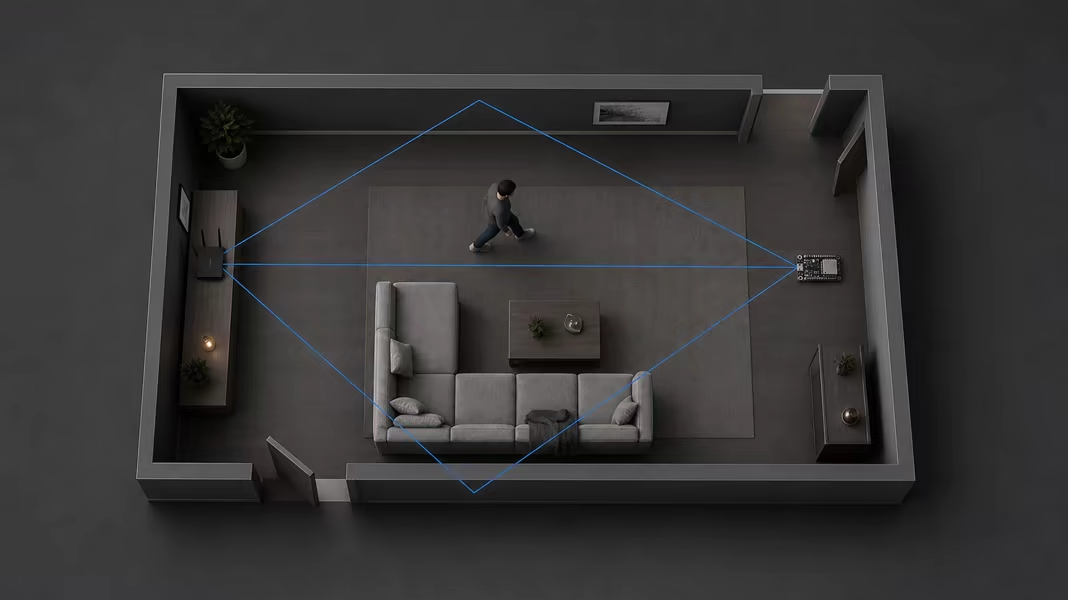
The signal travels from the access point to the sensor directly and through reflections off walls, furniture, and people. Movement is easiest to detect where it changes those paths, between and around the two ends of the link.
- Put the ESP32 in the area you want to monitor, about 3–8 m from the access point if the layout allows it.
- Keep the antenna end of the board open to the room, away from metal, electronics, and large obstacles.
- Mount it firmly. A board or cable that swings, vibrates, or gets moved during cleaning causes false motion on its own.
- Make sure the sensor gets steady traffic, and settle the placement before changing detector settings.
If the router's position means the link misses the area you care about, use two ESPectre devices instead.
Distance and RSSI
Distances are only a starting point: walls, transmit power, antennas, and furniture all change the link. ESPHome has a WiFi RSSI diagnostic sensor, and Live motion shows RSSI under Diagnostics.
| Observed RSSI | What it suggests | What to do |
|---|---|---|
Above -40 dBm | The receiver may be too close to the access point. | Move the sensor farther away before raising thresholds. |
-40 to -70 dBm | A good range for a first installation. | Run the ten-minute test below. |
-70 to -80 dBm | The link is weaker, and placement matters more. | Test carefully, and prefer a clearer path if results vary. |
Below -80 dBm | The signal is weak and more noise is likely. | Move the sensor or access point, or remove a heavy obstacle. |
Stronger is not always better. A very short link can work worse than a moderate, stable one that crosses the part of the room people use.
Angle and antenna orientation
There is no single best angle: the antenna type, the case, and nearby materials all change the result. Start with the antenna end clear of walls and the case, pointing toward the access point, and keep an external antenna vertical. Then compare orientations:
Check a quiet room
Leave the room empty and still long enough to see whether the score stays stable.
Walk the real route
Walk through the doorway, corridor, or path you want to detect. Waving a hand next to the board is not enough.
Rotate by 90 degrees and repeat
Change only the orientation. With Lightweight, restart the device and let it calibrate with the room still, then repeat the same walk. Keep the orientation where quiet and motion differ most.
Room layouts
Single room
- Let common walking routes cross the link between the access point and the sensor.
- Keep antennas out of cabinets and from behind furniture.
Doorway or corridor
- Place the sensor so the route crosses the link, straight or diagonally.
- Test the whole approach, and motion in adjacent rooms.
Several rooms
- Start with one sensor and map where it detects motion.
- Add another only after testing blind spots and unwanted detections, and tune each one separately.
Placements to avoid
- Inside a metal cabinet, behind a television, or pressed against a large metal surface.
- Next to the access point, or with both ends of the link in one corner and the walking routes elsewhere.
- At the edge of coverage, with patchy traffic or RSSI below about
-80 dBm. - Next to fans, curtains that move in the air, vibrating appliances, or anything else that moves.
- Where people can easily bump the board, its antenna, its power cable, or the access point.
A repeatable ten-minute test
ESPectre cannot guarantee an exact detection area: reflections can carry movement from outside the room, and some spots inside it can be missed. This test shows what the sensor actually covers.
Check the input
In Live motion Diagnostics, check accepted CSI and occupancy, and wait until the detector is ready.
Check the quiet room
With Lightweight, keep the room still while the sensor starts or recalibrates. Then watch the empty room for one or two minutes; the threshold may still drop a little if the first seconds were noisier.
Walk the target area
Walk the routes that should trigger motion, including the farthest part of the room.
Check unwanted areas
Walk outside the intended area and in adjacent rooms. Run the fans or appliances that are normally on. Note unwanted detections as well as missed movement.
Change one thing at a time
Move or rotate the sensor, restart it if it uses Lightweight so it calibrates in the new position, and repeat the same steps. Otherwise you won't know what helped.
Tune only after placement
Once you have the best spot, make small threshold or filter changes if still needed.
Placement with two ESPectre devices
One ESPectre device can send directly to another, so you choose both ends of the link without moving the router. Use it for a link across a doorway, along a corridor, or diagonally across a seating area. Each device still keeps its own motion state; the pair does not create a combined state or an isolated zone.
Keep both devices on the same channel
Start on 2.4 GHz. Connecting both to the same access point is the simplest arrangement. On a mesh, choose the same Preferred access point for both in Device settings; sharing an SSID alone does not ensure the same channel.
Set device B to receive
Connect to B in Live motion. Under Advanced sensing settings, set Wi-Fi traffic source to External device.
Point device A at B
Connect to A and select Wi-Fi raw. Next to Destination MAC, press the refresh button, then choose B from the menu. B appears only when its firmware advertises its station MAC and your network passes mDNS; otherwise, set
traffic_generator_target_macto B's station MAC in the firmware configuration. ESP32-C6 cannot be device A because it does not support Wi-Fi raw.Check input on both devices
Keep the default capture profile and packet rate. Check CSI accepted, CSI occupancy, and readiness on each device, and stop any other traffic generator feeding B during the test.
Test each device
A measures the acknowledgments from B, and B measures A's frames. Run the ten-minute test on each: cross between the boards, approach from both ends and sides, and repeat after moving either board, since that changes the link for both.
To return to normal sensing, set A's Destination MAC to Automatic (AP) and B's traffic source back to Ping (ICMP) or its previous choice. Custom builds and capture settings are covered in two-device sensing.